モデル
| モデルの生成、検定 | ||
| Model(*args,**kwargs) | モデルの変数と尤度因子をカプセル化 | |
| model_to_graphviz([model,var_names,formatting]) | graphviz図を生成 | |
| model_to_networkx([model,var_names,formatting]) | netwokxのダイグラフを生成 | |
| modelcontext(model) | モデルのコンテキストを返す。 |
| その他 | ||
| Deterministic(name,var[,model,dims]) | 定数 | |
| Potential(name,var[,model,dims]) | モデルの尤度に任意の因子を追加する | |
| set_data(new_data[,model,coords]) | 変数にデータを設定 | |
| Point(*args[,filter_model_vars]) | ポイントを生成 | |
| compile_fn(outs,*[,inputs,mode,...]) | PyTensor関数をコンパイル |
Model
モデルの変数と尤度因子をカプセル化する
class pymc.Model(*args, **kwargs)(使用例)
class CustomModel(Model):
    # 1) override init
    def __init__(self, mean=0, sigma=1, name=''):
        # 2) call super's init first, passing model and name
        # to it name will be prefix for all variables here if
        # no name specified for model there will be no prefix
        super().__init__(name, model)
        # now you are in the context of instance,
        # `modelcontext` will return self you can define
        # variables in several ways note, that all variables
        # will get model's name prefix

        # 3) you can create variables with the register_rv method
        self.register_rv(Normal.dist(mu=mean, sigma=sigma), 'v1', initval=1)
        # this will create variable named like '{name::}v1'
        # and assign attribute 'v1' to instance created
        # variable can be accessed with self.v1 or self['v1']

        # 4) this syntax will also work as we are in the
        # context of instance itself, names are given as usual
        Normal('v2', mu=mean, sigma=sigma)

        # something more complex is allowed, too
        half_cauchy = HalfCauchy('sigma', beta=10, initval=1.)
        Normal('v3', mu=mean, sigma=half_cauchy)

        # Deterministic variables can be used in usual way
        Deterministic('v3_sq', self.v3 ** 2)

        # Potentials too
        Potential('p1', pt.constant(1))

# After defining a class CustomModel you can use it in several
# ways

# I:
#   state the model within a context
with Model() as model:
    CustomModel()
    # arbitrary actions

# II:
#   use new class as entering point in context
with CustomModel() as model:
    Normal('new_normal_var', mu=1, sigma=0)

# III:
#   just get model instance with all that was defined in it
model = CustomModel()

# IV:
#   use many custom models within one context
with Model() as model:
    CustomModel(mean=1, name='first')
    CustomModel(mean=2, name='second')

# variables inside both scopes will be named like `first::*`, `second::*`
model_to_graphviz
PyMCモデルからGraphviz図を生成する。
| 変数 | 型 | |
| model | プロットするモデル | |
| var_names | プロットする変数のサブセット | |
| formatting | str |
図を表示させるためにはgraphvizをインストールしておく必要があります。condaパッケージマネージャーを使用する場合
conda install -c conda-forge python-graphviz(使用例)
import numpy as np
from pymc import HalfCauchy, Model, Normal, model_to_graphviz

J = 8
y = np.array([28, 8, -3, 7, -1, 1, 18, 12])
sigma = np.array([15, 10, 16, 11, 9, 11, 10, 18])

with Model() as schools:

    eta = Normal("eta", 0, 1, shape=J)
    mu = Normal("mu", 0, sigma=1e6)
    tau = HalfCauchy("tau", 25)

    theta = mu + tau * eta

    obs = Normal("obs", theta, sigma=sigma, observed=y)

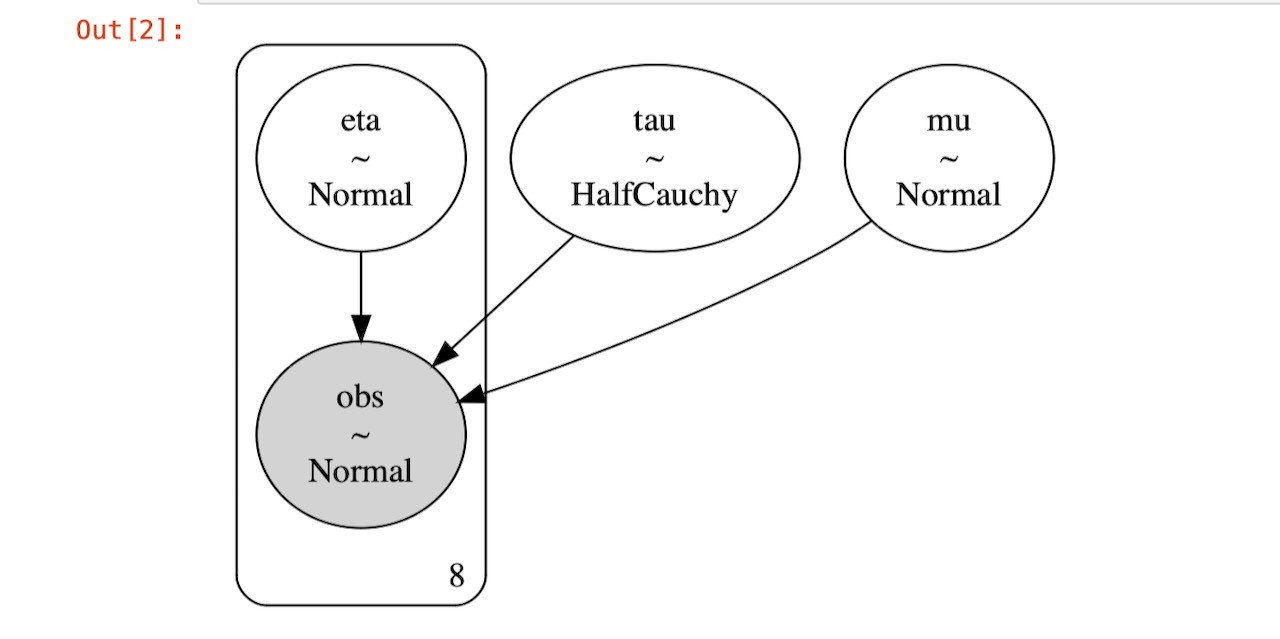
model_to_graphviz(schools)
以下の図は上記コードを実行した出力です。

model_to_networkx
PyMCモデルからnetworkx図を生成する。
pymc.model_to_networkx(model=None, *, var_names=None, formatting='plain')図を表示させるためには、networkxをインストールしておく必要があります。condaパッケージマネージャーを使う場合は、
conda install networkxpipでインストールする場合は、
pip install networkx| 変数 | 型 | |
| model | プロットするモデル | |
| var_names | プロットする変数のサブセット | |
| formatting | str |
(使用例)
import numpy as np
from pymc import HalfCauchy, Model, Normal, model_to_networkx

J = 8
y = np.array([28, 8, -3, 7, -1, 1, 18, 12])
sigma = np.array([15, 10, 16, 11, 9, 11, 10, 18])

with Model() as schools:

    eta = Normal("eta", 0, 1, shape=J)
    mu = Normal("mu", 0, sigma=1e6)
    tau = HalfCauchy("tau", 25)

    theta = mu + tau * eta

    obs = Normal("obs", theta, sigma=sigma, observed=y)

model_to_networkx(schools)
modelcontext
与えられたモデルを返します。
pymc.modelcontext(model)